Welcome to Bitfinex
Founded in 2012, Bitfinex is a cryptocurrency exchange providing advanced services for digital currency traders and liquidity providers. Bitfinex is the world’s most advanced cryptocurrency exchange and the world’s largest exchange by volume for trading Bitcoin against the U.S. Dollar. Bitfinex also facilitates the trading of many other altcoins.
Bitfinex is made up of 3 core features:
- Exchange Trading
At the heart of Bitfinex are central limit order books for the spot trade of digital tokens. Users can deposit, trade, and withdraw digital tokens.
- Margin Trading
Bitfinex allows qualified users to trade with up to 5x leverage, receiving financing with the help of our margin funding and peer-to-peer financing platform. When opening a financing position, users can manually enter a funding order to receive the desired amount of financing, at the rate and duration of their choice. Alternatively, users can open a financed trading position and Bitfinex will automatically link them with peer-to-peer financing at the current prevailing rate.
- Margin Funding
The P2P financing market provides users with a way to earn interest on their digital assets through lending out their funds to other users who want to trade with leverage.
To Get Started
The first thing you need to do after creating your Bitfinex account is to optimise your security settings. Bitfinex provides an advanced range of security features that users can enable to increase their account security and further protect their funds.
As a bare minimum, we insist for all users to create a strong, unique password for their Bitfinex account, and to combine this with Google 2FA. It is extremely important that you note down your 2FA key, made visible during the setup process, saved offline/in a secure location! A failure to do this can, in a worst case scenario, result in account lockouts lasting days.
We have a number of additional recommendations for all users who wish to ensure the safety of their funds –
- Enable two-factor authentication (2FA).
- Lock withdrawals when a new IP address is used.
- Setup a withdrawal confirmation phrase.
- Lock or disable withdrawal addresses for all currencies.
- Disable “Keep Session Alive”.
- Limit access to your account based on IP address.
- Enable PGP email encryption.
For more information on how to thoroughly secure your Bitfinex account, visit the Security section of the Bitfinex Knowledge Base.
Depositing Funds
To get started with trading on Bitfinex, you will first need to deposit some funds. This can come in the form of any of our supported cryptocurrencies (USD, EUR, GBP, JPY).
Fiat Currencies
Note that if you wish to deposit and trade fiat currencies (USD, EUR, GBP, JPY), you will first need to verifyyour account. In addition to letting you deposit, trade and withdraw fiat currencies, a verified account can also work to speed up deposit and withdrawal times.
We’ve put together a couple of guides to assist you through the verification process –
Please keep in mind that, once submitted, verification of your account can take up to 6-8 weeks. Whilst waiting, however, keep in mind that you can still deposit, trade and withdraw cryptocurrencies tokens prior to completing the verification process.
Cryptocurrencies
To make a deposit, visit the Deposit section of your Bitfinex account, found in the top right corner. Choose the currency you wish to deposit (e.g. BTC), generate an address in the wallet you wish to send to and input that address as the receiving address.
There are 3 wallets to choose from – Exchange, Margin and Funding.
- Exchange Wallet is used for buying & selling supported cryptocurrencies on the exchange.
- Margin Wallet is used when trading on margin.
- Funding Wallet is used when providing financing for other margin traders.
The most common type of wallet is the exchange wallet, which is used when buying and selling any of our supported currencies. It is simple and free to move funds between the three wallets, so don’t worry if you are unsure about which wallet you will be needing.
We’ve put together a few guides to help you through the deposit process –
- Making your first deposit
- Why are there 3 wallets to choose from?
- Where is my deposit?
- Why is my deposit unconfirmed?
- How do I perform a Ripple (XRP) deposit?
- How do I perform a Monero (XMR) deposit?
- How do I perform a Stellar (XLM) deposit?
- How do I perform EOS token based deposit?
- Deposit Fees
Please keep in mind that deposit times can fluctuate hugely based on network congestion, and the gas price used to send the deposit. More information on required deposit confirmations can be found here.
Making Your First Trade
You are now ready to make your first trade. To make a trade, follow the steps below –
- Make sure your funds are on your Exchange wallet. To transfer funds to your Exchange wallet, follow the steps outlined here.
- Find to the Trading page and select the pair you wish to trade (e.g. IOTA/ETH – buying IOTA using ETH)
- In the Order Form, select the Exchange tab.
- Specify the Order Type, Order Size, and Price. To make things simpler you can choose Market Order, resulting in your order being executed immediately at the current market price.
- When you have specified the type of order, size and price, simply click Exchange Buy or Exchange Sell to execute.
Using the IOTA/ETH example outlined above, pressing Exchange Buy would purchase IOTA using your existing ETH, whereas pressing Exchange Sell would sell your existing IOTA for ETH.
Your order should now appear in the Orders section, visible below the Chart. Once your order is executed, your funds will be credited to your Exchange wallet and the executed (or canceled) order will now move to the Order History tab.
Making your first trade on any exchange can be stressful as it often seems like there are many variables to keep in mind. We’ve put together another example below to help you make sense of it all.
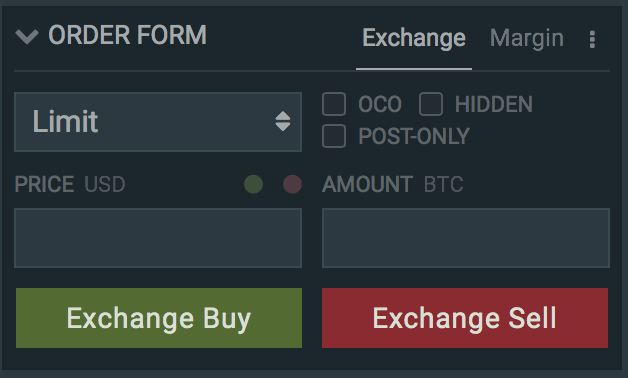
The picture above shows an Order Form for the IOTA/USD pair. At the very top, one can choose between Exchange (“normal” buying and selling) or Margin (trading on leverage.)
The first box, Limit, shows the type of order. A limit order allows you to specify the exact price and quantity you want (in contrast to e.g. a market order, which executes immediately against the best price available.)
The second box, Price USD, is the price you wish to pay/receive per IOTA token. Keep in mind that this is not the total price you wish to pay, but the price per individual token.
The third box, Amount IOTA, is the total amount of IOTA you wish to buy or sell. To make a purchase, click exchange buy; to sell IOTA, click exchange sell.
We’ve put together a couple of resources which will help guide you –
For more information on trading, visit our Trading on Bitfinex Knowledge Base.
Margin Funding
If you are not a trader and prefer safer investments, then the Bitfinex Margin Funding feature might be for you.
Through your Funding Wallet, you have the ability to “provide funding” to margin traders, in any of margin supported currencies on Bitfinex, earning interest on your holdings without subjecting yourself to the risks of active trading.
You can enter offers with your own chosen terms (desired return rate, duration, and amount). When an offer is taken by a margin trader, the money in your Funding wallet will be used by the trader to buy or sell bitcoins (open a position) on margin. When the trader completes his or her trade by closing the position, the bitcoins are bought or sold back and the money, plus added interest, is returned to your wallet.
Margin funding is a slightly more advanced topic but is quick to master. Additionally, your margin funding strategy can be set to auto-renew, putting your funding strategy on auto-pilot and earning you interest upon interest.
Margin Trading
Bitfinex also allows users to trade with up to 5x leverage, borrowing funding from the P2P margin funding platform to boost their trades.
Users can enter orders to borrow the desired amount of funding, at the rate and duration of their choice, or they can simply open a position and Bitfinex will take out funding for them at the best available rates. Margin trading is a highly advanced, high-risk activity and needs to be carefully considered.
We’ve put together a guide to margin trading for those interested in exploring this opportunity; we strongly recommend for all new users to read through this guide prior to engaging with margin trading.
Below are a few resources which you can look through for more information on margin trading –
Withdrawals
When you are finished trading and wish to withdraw your funds to a personal wallet or bank account, you can do so through the Withdraw function on your Bitfinex home page.
Fiat currencies
To withdraw fiat currencies (USD, EUR, GBP, JPY), your account first needs to be verified. After verifying your account, simply make your way to the withdrawal page, pick a currency (USD, EUR, GBP, JPY) and fill in your wire information (name, address and banking details).
The fee structure for withdrawing fiat currencies is 0.1% of the amount withdrawn, with a minimum $60.00. Standard withdrawals are processed within 5-15 days.
Express fiat withdrawals are processed with 24 hours (or 1 business day), at a fee of 1.00% of the withdrawn amount.
Cryptocurrencies
To withdraw cryptocurrencies, make your way to the withdrawal page. From here, select the cryptocurrency you wish to withdraw, e.g. Ethereum, and fill out the information as required. This includes filling out –
- The external address (where you wish to send the funds)
- The amount you wish to send
- The wallet you wish to send from (e.g. Exchange wallet)
After confirming that you have read and understood the conditions for auto-withdrawal processing, click request withdrawal.
We’ve put together an in-depth guide to making withdrawals, which should assist you through the process. Below are a compilation of resources which may answer any potential questions you may have –
Below are a compilation of resources which may answer any potential questions you may have –
- How do I make a withdrawal?
- How long does it take for a cryptocurrency withdrawal?
- How long does it take for a wire withdrawal?
- Where is my withdrawal?
- Why is my withdrawal “pending approval”?
- Why was my withdrawal cancelled?
- Why do I have a withdrawal hold?
Reports
For an in-depth overview of your account activity history (trades, deposits/withdrawals, balances, funding) you can make your way to the reports section. Reports can be downloaded for whichever date range required, in spans of 3 months at a time.
- Make your way to Reports.
- Select the type of report you would like to download.
- Select the appropriate Date Range.
- Press View for a quick view of the report.
- Press Download to download the report.
Visit the links below for more specific guides to viewing/downloading reports –
Please wait while you are redirected...or Click Here if you do not want to wait.